
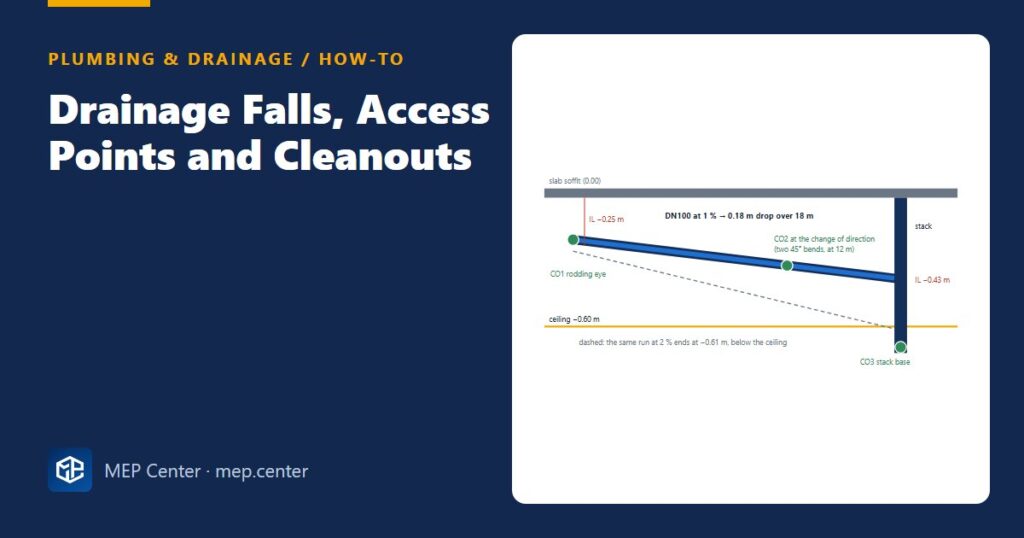
A drain laid too flat silts up, and one with no access point turns the first blockage into a ceiling or floor demolition job. Both problems start on the drawing: the falls were never checked against the ceiling void, and the cleanouts were left for the installer to “put where needed”.
Step-by-step
- Fix the outfall level first. Get the invert of the sewer connection or the inspection chamber, then work upstream. Why: the outfall is the one level you cannot change; working down from the fixtures often ends below the sewer.
- Choose the fall for each pipe size. Use the code minimums above and stay with one fall per run. Why: too flat and solids settle; much steeper than needed and you waste void depth. Small pipes need more fall than large ones because their flow is shallower.
- Calculate the drop and check the space. Drop = length × fall. Add it to the starting invert and check the far end against the ceiling level, the beams and the other services, or against the ground cover outside. Why: this is where most clashes are found, and they are cheap to fix only at this stage.
- Change direction gently. Use 45° bends or long-radius bends, and swept (Y) junctions that join in the direction of flow. Never use a plain tee into a horizontal drain. Why: sharp turns slow the flow, collect solids and make rodding hard.
- Keep trap arms within their limits. Under the IPC, the fall of a fixture drain between the trap and its vent must not exceed one pipe diameter. Why: if it drops further, the vent connection ends up below the trap weir and the trap siphons. See plumbing vent pipe rules.
- Place the cleanouts. Put one at the base of every stack, at every change of direction of more than 45° (the IPC allows one per 40 ft, about 12 m, where several bends are close together), at the junction of the building drain and building sewer, and at intervals on long straight runs (IPC: no more than 100 ft, 30 m, apart). Why: these are the points where blockages start and rods have to enter.
- Make them usable. A cleanout must open in the direction of flow, face a space where someone can work, and sit behind an access panel if the pipe is concealed. The IPC asks for about 18 in (450 mm) clear in front for pipes of 3 in and larger, 12 in (300 mm) for smaller ones, and a cleanout the same size as the pipe up to 4 in. Why: a cleanout behind a fixed cabinet does not exist on the day it is needed.
- Write the levels on the drawings. Show the invert levels at each end and at each junction, the fall in % or in/ft, and a tag for every access point. Why: installers lay what they can read; “laid to falls” alone gives you a pipe with a belly in it.
- Test before you close the ceiling. Do a water or air test to the local code, and a camera survey for buried drains. Why: the cheapest time to find a reverse fall is before it is covered.
Typical values — verify with the edition adopted locally.
Inputs: 110 mm plastic drain (DN100, about 4 in), 18 m from the first WC group to the stack. The ceiling is 0.60 m below the slab soffit. The pipe invert at the upstream end is 0.25 m below the soffit, which leaves space for hangers and a socket.
- At 1 % (close to the IPC 1/8 in/ft for 4 in): drop = 18 × 0.01 = 0.18 m. Downstream invert = 0.25 + 0.18 = 0.43 m. The bottom of the pipe sits at about 0.44 m, well above the 0.60 m ceiling.
- At 2 % “to be safe”: drop = 0.36 m and downstream invert = 0.61 m, which is below the ceiling. This does not fit, and the extra fall gains nothing for a pipe of this size.
- Cleanouts: one at the upstream end (a rodding eye pointing downstream), one at the 90° change of direction made with two 45° bends at 12 m, and one at the base of the stack the branch joins. No straight run is longer than 30 m.
Sanity check: 0.18 m over 18 m is 10 mm per metre. If the drawing shows the downstream invert higher than the upstream one, the fall is reversed. That is the most common error found at review.
Quick reference
| Item | IPC (US practice) | EN 12056 / European practice |
|---|---|---|
| Minimum fall, small pipes | 1/4 in/ft (≈ 2 %) for 2½ in and smaller | commonly 1–2 % for branches |
| Minimum fall, 3–6 in | 1/8 in/ft (≈ 1 %) | commonly 1 %; set by the capacity tables |
| Minimum fall, 8 in and larger | 1/16 in/ft (≈ 0.5 %) | national rules for large building drains |
| Cleanout spacing, horizontal drains | not more than 100 ft (30 m) | set by national rules |
| Cleanout at stack base | required | common practice and often required |
| Outside the building | building sewer cleanouts and manholes | inspection chambers and manholes to EN 752 and national rules |
Size the pipes before you set their falls: drainage pipe sizing with EN 12056 DU or IPC DFU. Pumped basement drains join this system through a backflow loop; see sump pump and pit sizing. More review points are in common plumbing design mistakes, and the void coordination in the MEP coordination clash checklist.
Ready-made drawings and tools for your next project
CAD block libraries, detail drawings and AutoCAD tools made by practising MEP engineers.
FAQ
What is the minimum fall for a drainage pipe?
Under the IPC it is 1/4 in/ft (about 2 %) for pipes of 2½ in and smaller, 1/8 in/ft (about 1 %) for 3 to 6 in and 1/16 in/ft (about 0.5 %) for 8 in and larger. EN 12056 practice is commonly 1 to 2 % for branches, with national rules for large drains.
Where are cleanouts required?
At the base of each stack, at changes of direction of more than 45°, at the junction of the building drain and the building sewer, and at intervals on long horizontal runs (no more than 100 ft, about 30 m, apart under the IPC). Each must be reachable, with clear space in front for rodding.
Is a steeper fall always better?
No. Beyond the code minimum, more fall uses up void depth without improving the flow much, and on very steep runs the water can run ahead of the solids. Use the code fall for the pipe size and keep it steady along the run.