
A contractor’s shop drawing lands on your desk with 30 sheets, a ten-day review period and a site team waiting to fabricate. If you only check that “it looks like our design”, the real problems — a smaller pump, a duct that no longer fits under the beam, a missing fire damper — show up on site instead.
Step by step
- Log it and check the basics. Submittal number, sheet list, revisions, scale with paper size and the drawing references the contractor used. Why: a shop drawing based on an old design revision fails before you look at a single pipe.
- Check the revision clouds first on a resubmission. Read your previous comments, then confirm each one is answered and nothing else changed without a cloud. Why: unclouded changes are the most common way unapproved changes get built.
- Compare sizes with the design. Duct and pipe sizes, cable tray widths, equipment tags, flow rates and pressures. A smaller size needs a calculation, not just a note. Why: downsizing to fit the space quietly breaks the hydraulic or airflow design.
- Match equipment to the approved material submittals. Dimensions, weights, connection sizes and sides, electrical supply, service clearances from manufacturer data. Why: the approved unit is often bigger or heavier than the one assumed in design.
- Check levels and coordination. Bottom-of-duct and pipe levels against beams and the ceiling, crossings with other services, combined services drawings where the contract requires them. Why: this is where the shop drawing earns its value — the design was not drawn at installation level of detail.
- Check gravity lines. Drainage and condensate falls continuous from start to riser, arrival levels shown, cleanouts and access points included. Why: a fall that disappears halfway along a corridor cannot be fixed by “adjusting on site”.
- Check supports and access. Hanger and bracket types and spacing, anchors and guides on long pipe runs, access panels for valves, dampers, fan coils and filters. Why: maintenance access is the first thing lost when space is tight.
- Check penetrations and fire compartments. Sleeves through beams and walls approved by the structural engineer, fire dampers and fire stopping at every fire-rated wall and floor. Why: these are expensive and slow to fix once concrete is poured.
- Check labelling and legends. System names, flow directions, tags matching the schedules, the legend matching the symbols used. Why: the shop drawing becomes the base of the as-built set.
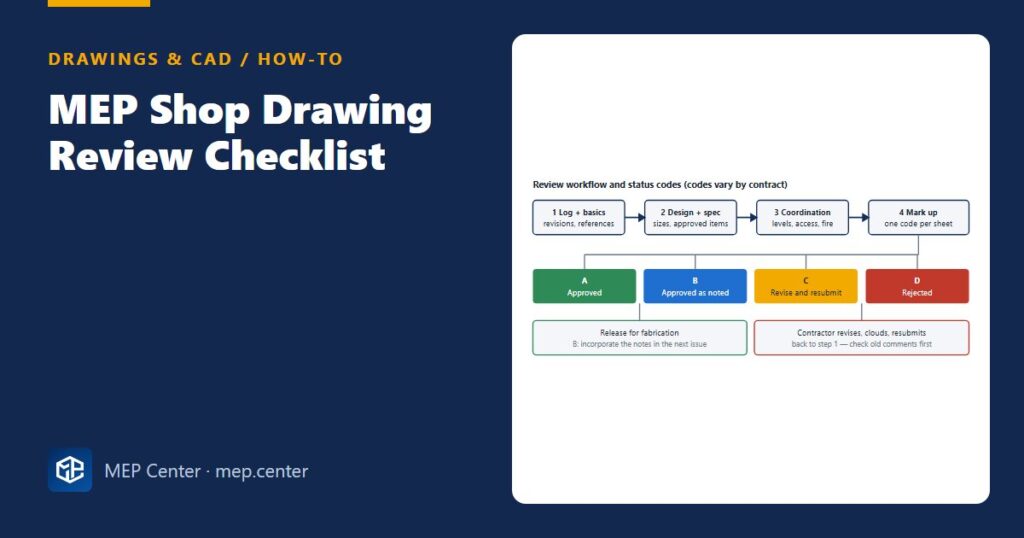
- Mark up, code and record. One clear comment per issue, numbered, with the reason; one status code per sheet; all comments in a review log. Why: vague comments such as “check” produce a second round with the same problems.
The checklist
| Area | Check |
|---|---|
| Sheet basics | Design revision referenced, scale with paper size, legend, north arrow, revision table |
| Sizes | Same as design or justified by calculation; tags match schedules |
| Equipment | Approved model, real dimensions and weight, connections, service clearance |
| Levels | Bottom-of-service levels under beams and above ceiling; insulation included |
| Gravity lines | Continuous fall, arrival level at riser, cleanouts |
| Supports | Hanger type and spacing, anchors, guides, expansion provisions |
| Access | Valves, dampers, fan coils, filters and boards reachable from the ceiling or floor |
| Penetrations | Sleeves approved by structure; fire dampers and fire stopping at rated walls |
| Electrical rooms | Working space in front of boards free of other services; no water pipes above boards |
| Labelling | System names, flow direction, valve and equipment tags |
What a review does not do
In most contracts the designer reviews for general conformance with the design intent; the contractor stays responsible for dimensions, quantities and site fit. Say so in your review stamp wording if the contract does, and never “approve” a change to the design that should be a formal variation — return it with a note instead. A shop drawing set prepared with the same layer and sheet conventions as the design is much faster to compare, and many items above come straight from the MEP coordination clash checklist. Shop drawings are usually drawn from models at fabrication detail; see BIM LOD for MEP for what that means.
Ask for the submission as one PDF per sheet, named by drawing number, so comments and status codes can be logged sheet by sheet — the same frame-based method described in splitting a multi-sheet CAD drawing into named PDFs. On fire protection shop drawings, check head positions, deflector distances and obstructions before anything else.
Review procedures, status codes and responsibilities vary — verify with your contract, the project specification and the local code adopted for each discipline.
Ready-made drawings and tools for your next project
CAD block libraries, detail drawings and AutoCAD tools made by practising MEP engineers.
FAQ
What should I check first on an MEP shop drawing?
Check that it references the latest design revision and the approved material submittals. A shop drawing based on an old design or on equipment that was never approved fails regardless of its detail.
What do the shop drawing status codes A, B, C and D mean?
A common scheme is A approved, B approved as noted, C revise and resubmit, and D rejected. The exact codes and wording come from the contract, so use those.
Is the designer responsible for dimensions on approved shop drawings?
In most contracts no. The review checks general conformance with the design; the contractor remains responsible for dimensions, quantities and fit on site. Check the review clause in your contract.
PAFTA – Sheet Splitter & Merger for AutoCAD
See a whole tender set as one drawing: merge a folder of DWG, DXF and vector PDF files, convert vector PDF to DWG and split any drawing back into sheets.
Free install from the Microsoft Store · 30-day trial · licence 20 € for all your devices or €15 per computer on our site